Ah Gravity Forms. Shall I compare thee to a summer’s day? Probably not. But I’m a huge fan of the plugin that gives so much power in building forms. I’ve used it for so much in my time in WordPress, that right now I’m confident if I need anything from a booking form to a custom search engine, Gravity Forms is my go to form.
One example I quite like is using Gravity Forms & Custom Post Types together to build something incredible. This is a go-to method for building any functionality, as it’s so expandable and extensible. In this article I’ll show you how to use Gravity Forms & Custom Post Types together to build a front end award nominators, allowing users to submit nominee into a custom post type.
Build the Custom Post Type
Now, usually I’d build these into code, but for this example, I’m going to use two plugins – one to create the custom post type (Custom Post Type UI), one to create the custom fields we’d be using with this custom post type (Advanced Custom Fields). In Custom Post Type UI plugin create your custom post type (I called it “nominee”). Make sure the “Custom Fields” checkbox in “Supports” is selected, and then click “Save Post Type”.
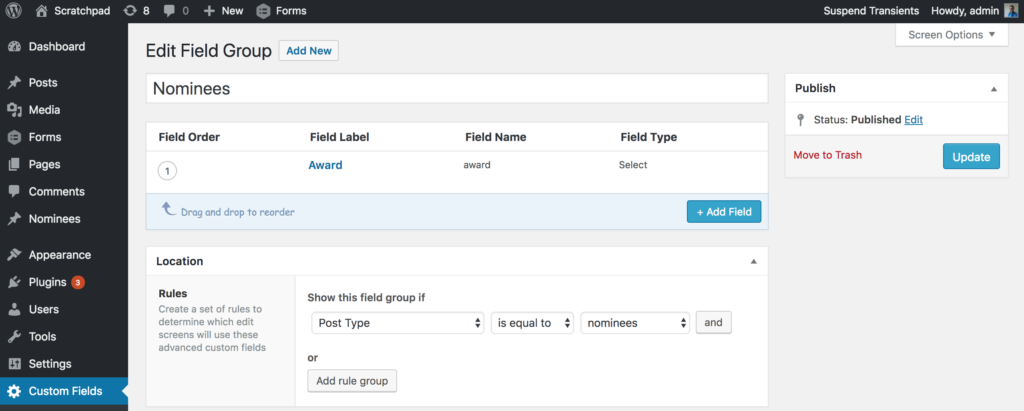
Now Install “Advanced Custom Fields” and go to Custom Fields. Create a custom field group and make sure you give it a few custom fields. Add a rule so that you show the field group if Post Type is equal to “nominees” and then click “Publish”.
Your custom post type should now be present in the sidebar, try creating a new post to make sure that it all works.
Install Gravity Forms & Custom Post Type Plugin
Now we need Gravity Forms as well as a helper plugin. Install Gravity Forms and the Gravity Forms + Custom Post Type Plugin. This plugin is freely available on the WordPress Repository so be sure to install both. Now we will create our form.
Create Your Gravity Form to Hook into Your Custom Post Type
Once installed create a form in Gravity Form. You’re going to need the following fields at the very least.

Title Field
This is under the “Post” Group and you need to make sure that when you place it you assign it a Post Type.
Body Field
This will be the main body of the custom post type. If you don’t have any body text you can skip this but otherwise add one in as it makes creating a template easier.
Custom Fields
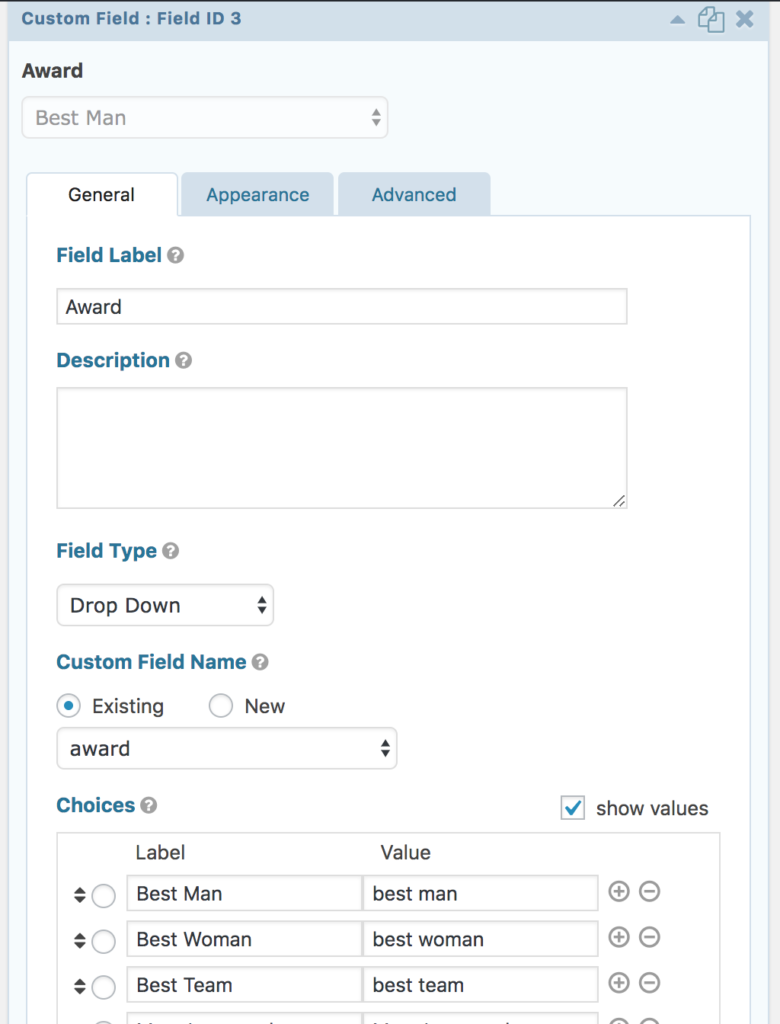
What I do here is use the test post created in the previous step to populate the “Custom Field Name” drop down. This removes the guess work in creating fields, but you will need to manually match up your custom field type in Gravity Forms with your custom field type created in ACF. This could lead to problems if you have checkboxes, select boxes or radio buttons and the names don’t match, so make sure they do.
Place The Form On The Front End
Now you need to place the Gravity Form on a page or post within your site. To do so go to the page or post that you wish to put your form on and click the “Add Form” button. Select the form and a shortcode will appear on that page. Update the page or post and go onto the next step.

Test!
Finally, get testing! Go to the page and try filling out the form. Click “Submit” when done.
Then return to the admin section and go to your post type, you should see your post that you submitted there all ready to be worked with!

It should be added that custom fields, whilst present, are unlikely to show on the front end unless you do some template work, but that is how you can use Gravity Forms & Custom Post Types together to allow people to submit custom post types.

Thanks for awesome tutorial. I was using default Gravity Form post fields on my website and wasn’t aware that we can also get the posts submitted as Custom Post Types.
Your tutorial has really made the things easy. I would like to add a tip for users who are not good with coding, that there is also a free styler plugin in WordPress repository for Gravity Forms which you can use so, that your forms don’t look ugly.
https://wordpress.org/plugins/styles-and-layouts-for-gravity-forms/
So, for this tutorial my setup was ‘Gravity Forms’ + ‘Custom Post Type UI’ + ‘Advanced Custom Fields’ + ‘ Gravity Forms + Custom Post Type Plugin’ + ‘Styles & Layouts for Gravity Forms’.
Also worth noting is the fact that you should enable either Recaptcha or Honeypot to prevent spam submission for your form. This is the issue I initially faced when I was using default Gravity Form post field.
September 7, 2018 at 11:02 am